
Macro Photography in Nature
Macro photography has always been one of my favorite areas of nature photography.
Some of the smallest things in nature can make incredible photographs once you start looking a little more closely. It’s a fascinating way to explore details, patterns and subjects that we might otherwise walk straight past.
As you get more involved in macro photography, there’s almost no limit to how far you can take it. You can start relatively simply, then progress into higher magnifications and more specialist techniques as your interest and skills develop.
Here are some of the things I’ve learned about photographing the smaller side of the natural world.
What Is Macro Photography?
At its simplest, macro photography is photography of small things.
For me as a nature photographer, that usually means subjects such as insects, butterflies, flowers and other tiny details in the natural world.
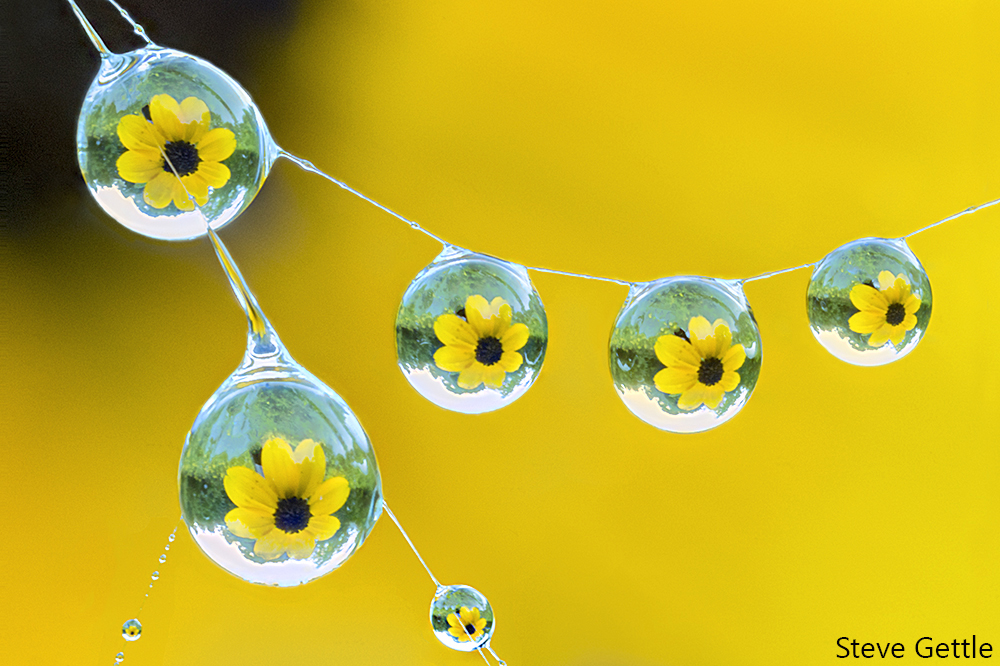
As your skills develop, you can start experimenting with higher magnifications and more specialist techniques. I’ve photographed everything from the scales on a butterfly’s wing and dew drops on spiderwebs to individual snowflakes.
But you certainly would not want to start there!
What Gear Do You Need for Nature Macro Photography?
You don’t need a huge amount of specialist macro photography gear or tools when you’re starting out.
A camera, a lens that allows you to focus closely and a sturdy tripod can take you a long way.
You can see the macro photography gear I currently use on our photography gear page.
Choosing a Lens for Macro Photography
I use two dedicated macro lenses: a 200mm and a 105mm.
Whenever possible, I prefer working with the 200mm because it allows me to work farther away from my subject. The narrower angle of view provided by the 200mm also helps to better control the background. If I can’t get far enough away, or If I am using macro flash, I’ll use the 105mm instead.
A great one lens solution is the now discontinued Sigma 150mm macro. You can often find these in good condition on the used market.
There are plenty of macro lenses available, but you don’t necessarily need to buy one straight away if you simply want to experiment.
A great first step is to use extension tubes on an existing lens. Extension tubes are simple hollow tubes that fit between the camera and lens. They allow your existing lens to focus closer to your subject.
Another option is a close-up diopter. These are like reading glasses that attach to the front of the lens and also allows you to focus more closely.
Both of these will work on any lens. Often people try them with something like a 70-200mm.
Both can be useful ways to start exploring macro photography without immediately investing in another lens. And if you become hooked on macro photography, you can continue using them with a dedicated macro lens to achieve even greater magnification.
Why a Tripod Matters for Macro Photography
A good tripod is one of the most important pieces of equipment I use when doing macro photography.
One of the big challenges with macro photography is that the closer you get, the less depth of field you have. We’re constantly fighting to get enough of our subject sharp.
I’ll often stop my lens down to apertures such as f/16 or f/22 to increase the depth of field. The trade-off is that this can result in some surprisingly long exposures.
When I’m photographing macro subjects in the field, I’ll sometimes make exposures lasting 15 or even 20 seconds.
At those shutter speeds, the camera needs to be completely stable. I’ll also use a cable release so that I’m not touching the camera when I make the exposure. The camera’s two-second timer can work too, although a cable release gives me more control over exactly when the exposure begins.
That’s particularly useful when I’m waiting for a moment when the wind stops moving my subject.

Photographing Insects Early in the Morning
One of my favorite types of macro photography is photographing insects.
My preferred time to do this is very early in the morning, when the temperature is still cool. When temperatures are below 55 insects are in a state of torpor and will sit still for these long exposures. At these cooler temperatures they may also be covered in dew, which can make an already interesting subject even more interesting photographically.
I’ll often head out about 45 minutes before sunrise, set up my gear and start carefully searching back and forth through a meadow looking for insects.
When I find something promising, I’ll mark the location with something small such as a clothespin and continue looking for other subjects.
Believe me, this helps! You can find a tiny insect, turn around and then struggle to find exactly where it was again.
I’ll usually locate two or three subjects and then return to photograph them as the light starts to come up.
Look for Soft Light and Still Conditions
For this type of nature macro photography, I’m generally looking for a cool, windless morning with soft light.
I want to find my subjects before the light becomes too harsh.
Once direct sunlight reaches a subject, it can create strong contrast and shadows. Macro photography for me is often about showing all those beautiful little details, so I prefer quiet, soft light that allows those details to really stand out.
Cloudy days can work well for the same reason.
Wind is another challenge.
If you’re making a four-, six- or even 15-second exposure, even a small amount of movement can ruin the photograph. Sometimes I’ll use a diffuser or something similar simply to block the wind while I’m working.
Using a Reflector for Macro Photography
When I’m working outside, I use a reflector a lot.
Early in the morning, my subject is often in the shade and most of the available light is coming from the sky above.
I’ll use a reflector to bounce some of that light back onto the subject. I use one with white and gold sides. The white gives me a more neutral light, while the gold can be used when I want something warmer.
The idea isn’t to make the photograph look artificially lit. I simply want to balance the natural light and bring out the details in the subject.

Macro Photography Settings and Depth of Field
There isn’t one set of camera settings that will work for every macro photograph.
My settings depend on the subject, available light, magnification and what I’m trying to achieve.
For the early-morning insect photography I’ve described here, I might be working at f/16 or f/22 and around ISO 100–400. Because the light levels are low, that can result in exposures of several seconds.
The important thing to understand is just how limited your depth of field becomes as you get closer to your subject.
At high magnifications, we’re sometimes dealing with an incredibly small zone of sharpness.
That makes focusing carefully particularly important.
Where Should You Focus in Macro Photography?
When I’m working with a stationary subject early in the morning, there’s usually no need to rush. That’s one of the things I enjoy about this type of photography.
Macro photography can be very methodical. One of the best things about macro photography is it teaches you to be a better technician. Which is an important aspect in all genres of photography.
For most of my macro photography, I focus manually.
Since at magnification we have a very narrow depth of field, so we don’t want to waste any of it. This makes our focus point very important. Generally, 1/3 of the depth of field is in front of your focus point and 2/3rds is behind. So ideally, I want to focus about a third of the way into my subject.
Once I get everything setup I will make the image. Then I’ll zoom into the image on the back of the camera and check that the areas I want sharp really are sharp.
I’ll look around the entire frame, check the composition and then double check the histogram for my exposure. If something isn’t quite right, I can make an adjustment and try again.
Having the camera locked onto a tripod really helps with this process. It encourages you to slow down and pay attention to all of these important little details.

Using Focus Stacking in Macro Photography
Sometimes even a small aperture isn’t enough to give you the depth of field you need.
This is where focus stacking becomes useful.
Instead of relying on one exposure, you make a series of photographs focused at different points through the subject, starting at the nearest area you want sharp and continuing through to the farthest.
Those images can then be combined to produce a final photograph with a much greater area of sharpness than would have been possible with a single exposure.
I’ve used this technique when photographing subjects such as a dragonfly’s face at high magnification.
At these higher magnifications, I may also use a focusing rail. Rather than adjusting the focus on the lens, the rail moves the entire camera forward and backward in very small increments.
This is getting into the more advanced end of macro photography, but it’s also where all kinds of new creative possibilities begin to open up.
I also cover techniques like focus stacking in my advanced macro photography presentations.
Finding Macro Photography Ideas Close to Home
One of the best things about macro photography is it is very accessible. You don’t need to travel to exotic locations to find great macro photography subjects.
In fact, for the first 15 years of my career, I did much of my macro photography in a little three-acre meadow just five minutes from my house.
A local meadow can provide an incredible variety of subjects. Look for insects, butterflies and wildflowers, or explore the patterns and details within leaves and flowers. Spiderwebs covered in dew can also make fascinating subjects.
You can even bring flowers home and explore smaller sections and patterns rather than photographing the whole flower.
The potential subject matter is almost infinite.
Of course, I also love using macro photography when we travel. It gives you another way to explore the incredible variety of the natural world, and notice subjects that might otherwise be overlooked, from insects and flowers to all kinds of tiny details.
But you don’t have to go anywhere special to get started.
The more time you spend looking closely at familiar places, the more you begin to notice things you might previously have walked straight past.

Learn About the Nature You’re Photographing
As with any kind of nature photography, the more you know about your subject, the better you’re going to be able to photograph it.
Understanding where an insect is likely to be found, which plants it uses and how it behaves can help you find better opportunities.
The same applies whether you’re photographing an insect, bird or mammal. Knowing more about the subject helps you recognize the behaviors, characteristics and moments that are worth trying to capture.
For me, that’s a huge part of nature photography.
Keep Exploring the Small Stuff
Macro photography can be as simple or as technical as you want to make it.
As your interest develops, you might find yourself experimenting with extension tubes, focus stacking or increasingly higher magnifications.
I’ve taken that curiosity pretty far over the years, including photographing individual snowflakes through a homemade microscope and creating extreme close-ups of insects.
But it all comes back to the same thing: showing people something they might not normally be able to see.
That’s what I love about macro photography. It opens up an entire world of photographic possibilities simply by encouraging us to look more closely.
Good Luck and Good Light!
Steve & Nicole
Macro Photography FAQs
Macro photography is photography of small subjects at close range. In nature photography, that might include insects, butterflies, flowers, spiderwebs and other small details that can easily go unnoticed.
You don’t need a huge amount of equipment to get started. A camera, a lens that can focus closely and a sturdy tripod can take you a long way. A dedicated macro lens is useful, but extension tubes or a close-up diopter can also allow an existing lens to focus closer.
There isn’t one group of settings that works for every macro photograph. Settings vary according to the subject, available light and magnification. For early-morning insect photography, I often work around f/16–f/22 and ISO 320–400, with shutter speeds sometimes running to several seconds because of the low light.
I prefer very early mornings when conditions are cool, still and the light is soft. I’ll often arrive around 45 minutes before sunrise to find insects before they become more active as temperatures rise. Early-morning insects may also be covered in dew, creating additional photographic opportunities.
Not at all. Some of the best macro photography opportunities can be found close to home. Local meadows, gardens and other natural spaces can provide subjects including flowers, insects, butterflies, leaves and spiderwebs.